I promised in the comments a few days ago that I would post how one would go about saving a photo using the program I created in the last Core Image post. We’re already passing the video feed into a CIImage before we write it to the screen. All we need to do is take that CIImage and save it to the photo album. You’ll need the files from that post.
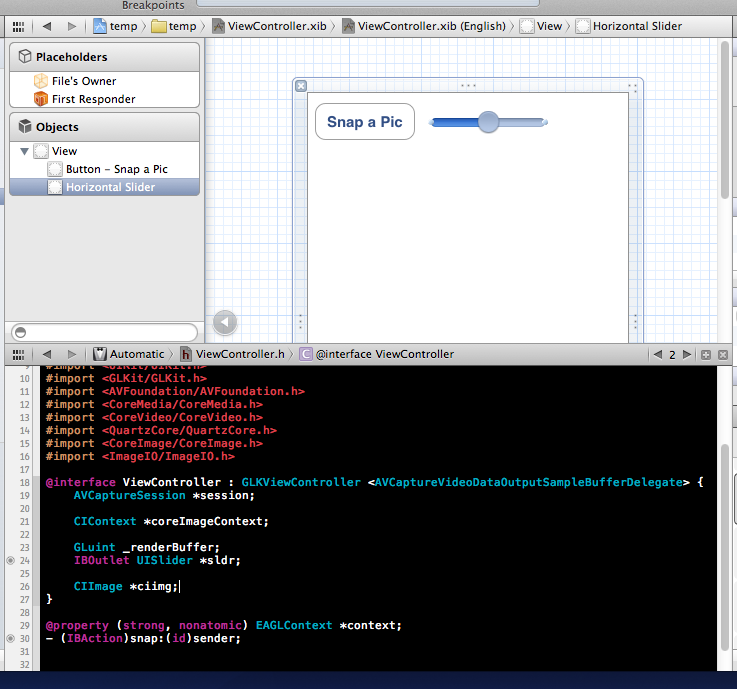
Add a button to the .xib file, create a method called -(void)snap:(id)sender and hook it up to the button. While we are here, lets add a slider to the view as well. I’m creating an IBOutlet for the slider called ‘sldr’. This we will use to edit the input for the CIFilter. Finally, we are going to need access to the CIImage we’re using outside the scope of the camera delegate callback method so add a CIImage instance variable. Like so:
 Now we’ll add the code that saves the pic to the photo library:
- (IBAction)snap:(id)sender {
    CGImageRef cgimg = [coreImageContext createCGImage:ciimg fromRect:[ciimg extent]];
    ALAssetsLibrary *lib = [[ALAssetsLibrary alloc] init];
    [lib writeImageToSavedPhotosAlbum:cgimg metadata:nil completionBlock:^(NSURL *assetURL, NSError *error) {
        CGImageRelease(cgimg);
    }];
}
The ALAssetsLibrary object requires that we import the AssetsLibrary framework. Make sure you do that.
Go back to the -captureOutput:didOutputSampleBuffer:fromConnection: method from the sample code provided and change all the references to ‘image’ to our instance variable ‘ciimg’. The first reference to ‘image’ declares it as a CIImage object, you can take out the declaration, replace ‘CIImage *image’ to simply ‘ciimg’.
If you run this now, you can hit the button and it will save the image to your photo library. Like so:
We still have an orientation problem. I didn’t deal with this in the first post, but lets do something about it now. Edit your captureOutput method so that it applies a CGAffineTransform to the incoming CIImage like so:
-(void)captureOutput:(AVCaptureOutput *)captureOutput didOutputSampleBuffer:(CMSampleBufferRef)sampleBuffer fromConnection:(AVCaptureConnection *)connection {
	CVPixelBufferRef pixelBuffer = (CVPixelBufferRef)CMSampleBufferGetImageBuffer(sampleBuffer);
	ciimg = [CIImage imageWithCVPixelBuffer:pixelBuffer];
	UIDeviceOrientation orientation = [[UIDevice currentDevice] orientation];
	CGAffineTransform t;
	if (orientation == UIDeviceOrientationPortrait) {
		t = CGAffineTransformMakeRotation(-M_PI / 2);
	} else if (orientation == UIDeviceOrientationPortraitUpsideDown) {
		t = CGAffineTransformMakeRotation(M_PI / 2);
	} else if (orientation == UIDeviceOrientationLandscapeRight) {
		t = CGAffineTransformMakeRotation(M_PI);
	} else {
		t = CGAffineTransformMakeRotation(0);
	}

	ciimg = [ciimg imageByApplyingTransform:t];
	ciimg = [CIFilter filterWithName:@"CIFalseColor" keysAndValues:
	kCIInputImageKey, ciimg,
	@"inputColor0", [CIColor colorWithRed:0.0 green:0.2 blue:0.0],
	@"inputColor1", [CIColor colorWithRed:0.0 green:0.0 blue:1.0], nil].outputImage;
	[coreImageContext drawImage:ciimg atPoint:CGPointZero fromRect:[ciimg extent] ];
	[self.context presentRenderbuffer:GL_RENDERBUFFER];
}
If you take a photo in the camera’s photo app, it automatically saves the orientation in the photo’s metadata. It’s our responsibility to deal with this, we entered nil for the metadata, which just means that the photo is saved in the default orientation. Because we have now rotated the incoming pixels to support all orientations, this default will work. When you look at your saved photos they will be right side up now.
However, this won’t always work. In you application you may need to consider importing a photo or video that is in another orientation, editing it, and then saving a photo to the library in that same orientation. I’m not going to cover doing that right now, but I thought it was worth mentioning the issue.
Just for fun, let’s use that slider now. Go in and edit that our captureOutput method again. Change the CIFilter line to the following:
	ciimg = [CIFilter filterWithName:@"CIFalseColor" keysAndValues:
	kCIInputImageKey, ciimg,
	@"inputColor0", [CIColor colorWithRed:0.0 green:sldr.value blue:0.0],
	@"inputColor1", [CIColor colorWithRed:0.0 green:sldr.value blue:1.0], nil].outputImage;
Now you can use the slider move between really light green and blue. Here’s a link to the SimpleAVCamera2.
What are you interested in doing with Core Image out there? I’m interested in what you might want me to tackle. Post in the comments what you’d like me to try and do with Core Image.

Thank you very much for posting this. I’ve developed a pretty wide area of CIFilter effects since iOS 5 came out and i’m excited to use those in this type of application. I don’t understand how the dimensions of the CIImage drawn in the CIContext are determined though. I’d like to make the live preview full screen—do you know how that can be achieved?